Setting Up Elasticsearch, Kibana, and Fleet Server on Ubuntu (Step-by-Step Guide)
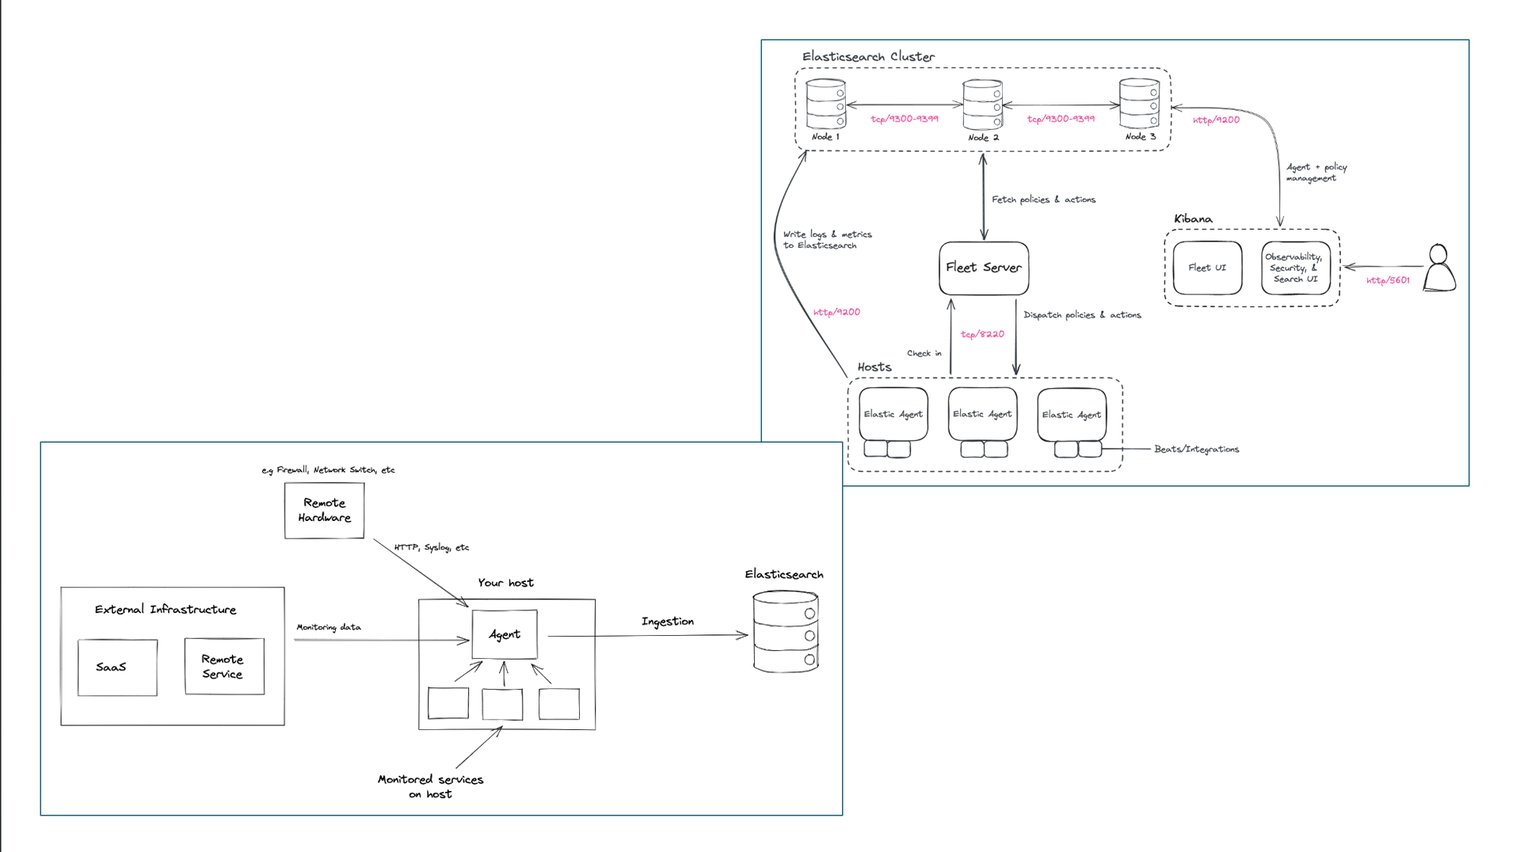
This guide walks through setting up a full Elastic Stack (Elasticsearch, Kibana, and Fleet Server) on a single Ubuntu server using DEB packages. This setup is ideal for local testing or small deployments.
Prerequisites
- Clean Ubuntu 20.04 or later
- Terminal command knowledge
- Root or sudo privileges
Step 1: Install Elasticsearch
1.1 Add Elasticsearch’s GPG Key
wget -qO - https://artifacts.elastic.co/GPG-KEY-elasticsearch | sudo apt-key add 1.2 Add Elasticsearch’s Repository
sudo sh -c 'echo "deb https://artifacts.elastic.co/packages/8.x/apt stable main" > /etc/apt/sources.list.d/elastic-8.x.list'1.3 Install Elasticsearch
sudo apt update
sudo apt install elasticsearch
Note: During installation you may be shown a password for the built-in elastic superuser — save that password, and note any output telling you how to start Elasticsearch.
1.4 Run Elasticsearch as a Service
sudo systemctl daemon-reload
sudo systemctl enable elasticsearch.service
1.5 Configure Elasticsearch
sudo nano /etc/elasticsearch/elasticsearch.ymlUncomment or add these lines (replace the IP with your server IP):
# in /etc/elasticsearch/elasticsearch.yml
network.host: 192.168.1.1  # Use your server's IP
transport.host: 0.0.0.0
1.6 Start Elasticsearch
sudo systemctl start elasticsearch.servicesudo curl --cacert /etc/elasticsearch/certs/http_ca.crt -u elastic:$ELASTIC_PASSWORD https://localhost:9200Replace $ELASTIC_PASSWORD with the password shown during install.
sudo systemctl status elasticsearchStep 2: Install Kibana
2.1 Install Kibana
sudo apt install kibana
sudo /usr/share/elasticsearch/bin/elasticsearch-create-enrollment-token -s kibana
2.2 Configure Kibana
sudo nano /etc/kibana/kibana.ymlSet the server host (replace with your server IP):
# in /etc/kibana/kibana.yml
server.host: 192.168.1.1
2.3 Start and Enable Kibana
sudo systemctl daemon-reload
sudo systemctl enable kibana.service
sudo systemctl start kibana.service
Kibana will be accessible at http://your_server_ip:5601.
sudo systemctl status kibanaWhen Kibana first starts it may generate a one-time URL with a 6-digit code. Open that URL, paste the enrollment token you generated earlier, and log in with the elastic credentials from the Elasticsearch install.
Step 3: Secure Elasticsearch and Kibana
3.1 Set Up Built-in Users
sudo /usr/share/elasticsearch/bin/elasticsearch-setup-passwords interactiveFollow the prompts and record all generated passwords (elastic, kibana_system, logstash_system, etc.).
3.2 Update Kibana with the kibana_system Password
sudo nano /etc/kibana/kibana.ymlAdd the kibana_system credentials:
elasticsearch.username: "kibana_system"
elasticsearch.password: "your_kibana_system_password"
sudo systemctl restart kibanaStep 4: Install and Set Up Fleet Server
4.1 Install Elastic Agent
wget https://artifacts.elastic.co/downloads/beats/elastic-agent/elastic-agent-8.15.1-amd64.deb
sudo dpkg -i elastic-agent-8.15.1-amd64.deb
4.2 Generate a Fleet Enrollment Token
In Kibana: Fleet → Agents → Add agent. Choose the option to run Fleet Server on the host and generate a service token. Copy the token for the next step.
4.3 Enroll Elastic Agent as Fleet Server
sudo elastic-agent install \
--fleet-server-es=https://localhost:9200 \
--fleet-server-service-token=YOUR_SERVICE_TOKEN \
--fleet-server-policy=fleet-server-policy \
--fleet-server-es-ca-trusted-fingerprint=YOUR_FLEET_SERVER_CA_FINGERPRINT
--insecure
Replace YOUR_SERVICE_TOKEN with the token from Kibana and YOUR_FLEET_SERVER_CA_FINGERPRINT with the CA fingerprint from your Elasticsearch instance.
After successful enrollment, Fleet Server will be running and managed via Kibana Fleet.