Setting Up Elasticsearch, Kibana, and Fleet Server on Ubuntu (Step-by-Step Guide)
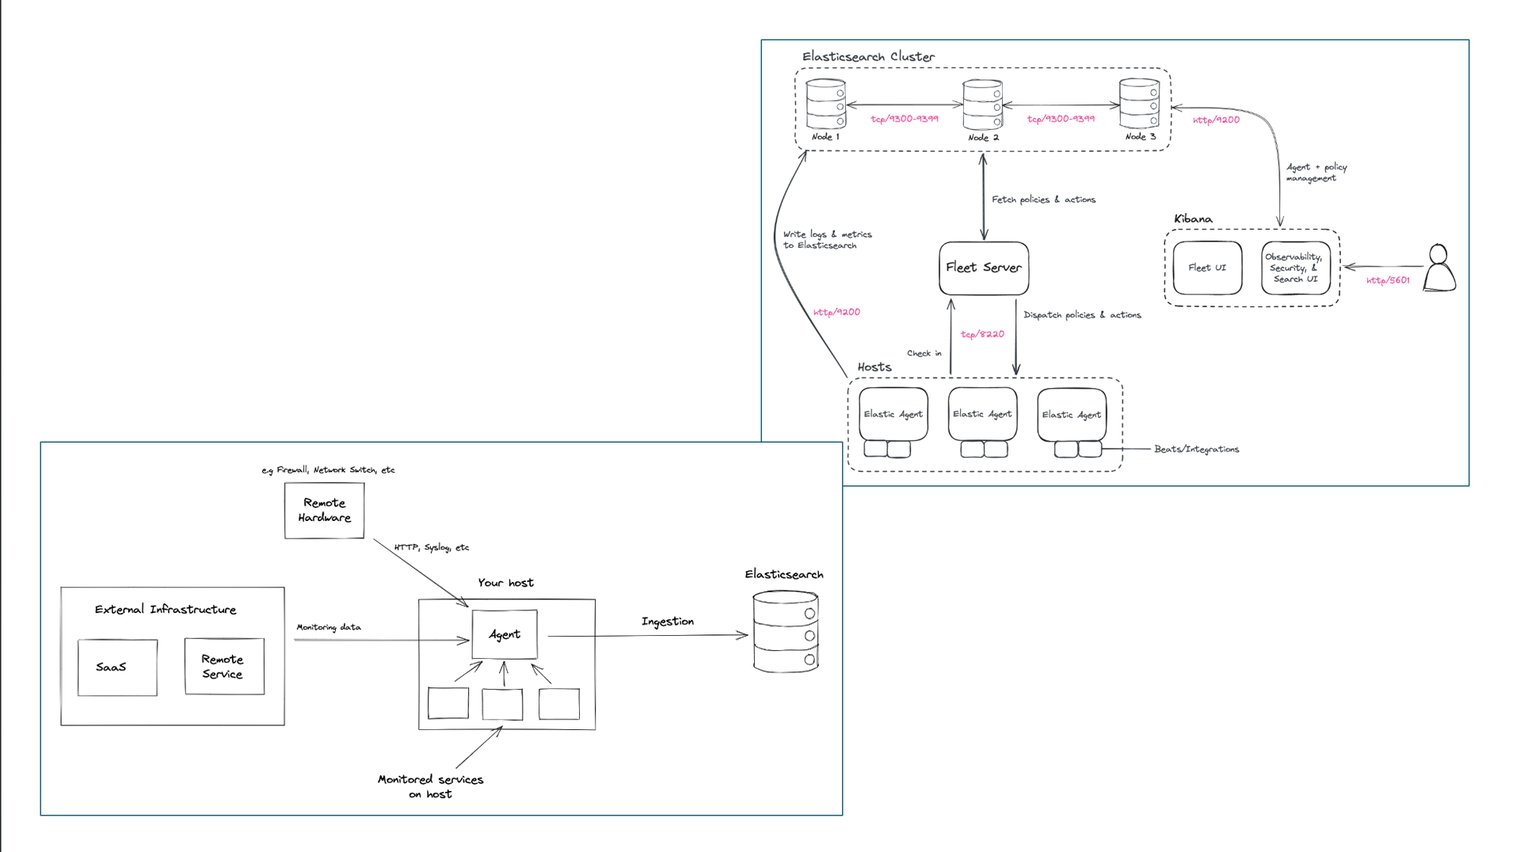
This guide walks through setting up a full Elastic Stack (Elasticsearch, Kibana, and Fleet Server) on a single Ubuntu server using DEB packages. This setup is ideal for local testing or small deployments.
Prerequisites
Clean Ubuntu 20.04 or later
Terminal command knowledge
Root or sudo privileges
Step 1: Install Elasticsearch
1.1 Add Elasticsearch’s GPG Key
Ensure the downloaded packages are legitimate by adding the official GPG key:
wget -qO – https://artifacts.elastic.co/GPG-KEY-elasticsearch | sudo apt-key add –
1.2 Add Elasticsearch’s Repository
Add Elastic Stack’s repository to your system:
sudo sh -c ‘echo “deb https://artifacts.elastic.co/packages/8.x/apt stable main” > /etc/apt/sources.list.d/elastic-8.x.list’
1.3 Install Elasticsearch
Update your package list and install Elasticsearch:
sudo apt update
sudo apt install elasticsearch
During installation, note the password for the built-in elastic superuser account and the command to start Elasticsearch.
1.4 Run Elasticsearch as a Service
Reload the system daemon and enable Elasticsearch to run as a service:
sudo systemctl daemon-reload
sudo systemctl enable elasticsearch.service
1.5 Configure Elasticsearch
To allow external connections, modify the Elasticsearch config file:
sudo nano /etc/elasticsearch/elasticsearch.yml
Uncomment and update these lines:
network.host: 192.168.1.1 # Use your server’s IP
transport.host: 0.0.0.0
1.6 Start Elasticsearch
Start the Elasticsearch service:
sudo systemctl start elasticsearch.service
Verify Elasticsearch is running:
sudo curl –cacert /etc/elasticsearch/certs/http_ca.crt -u elastic:$ELASTIC_PASSWORD https://localhost:9200
Replace $ELASTIC_PASSWORD with the password from the install output.
Check Elasticsearch service status:
sudo systemctl status elasticsearch
Step 2: Install Kibana
2.1 Install Kibana
Install Kibana from the Elastic repository:
sudo apt install kibana
Generate an enrollment token for Kibana:
sudo /usr/share/elasticsearch/bin/elasticsearch-create-enrollment-token -s kibana
2.2 Configure Kibana
Edit the Kibana configuration to point it to your Elasticsearch instance:
sudo nano /etc/kibana/kibana.yml
Update the following with your server’s IP:
server.host: 192.168.1.1
2.3 Start and Enable Kibana
Enable and start Kibana:
sudo systemctl daemon-reload
sudo systemctl enable kibana.service
sudo systemctl start kibana.service
Kibana will be accessible at http://your_server_ip:5601.
Check Kibana status:
sudo systemctl status kibana
When Kibana starts, a URL with a 6-digit code will be generated. Open the URL, paste the enrollment token, and log in with the elastic user credentials from the Elasticsearch installation.
Step 3: Secure Elasticsearch and Kibana
3.1 Set Up Built-in Users
Set passwords for the built-in users (elastic, kibana_system, etc.):
sudo /usr/share/elasticsearch/bin/elasticsearch-setup-passwords interactive
Follow the prompts and note the passwords for future use.
3.2 Update Kibana with the Kibana System User Password
Edit the Kibana configuration to include the kibana_system user password:
sudo nano /etc/kibana/kibana.yml
Add:
elasticsearch.username: “kibana_system”
elasticsearch.password: “your_kibana_system_password”
Restart Kibana:
sudo systemctl restart kibana
Step 4: Install and Set Up Fleet Server
4.1 Install Elastic Agent
Download and install the Elastic Agent:
wget https://artifacts.elastic.co/downloads/beats/elastic-agent/elastic-agent-8.15.1-amd64.deb
sudo dpkg -i elastic-agent-8.15.1-amd64.deb
4.2 Generate a Fleet Enrollment Token
In Kibana, go to Fleet > Agents and click Add agent. Choose the option to run Fleet Server on the host and generate a service token. Copy the token for use in the next step.
4.3 Enroll Elastic Agent as Fleet Server
Run the following command to enroll Elastic Agent as Fleet Server:
sudo elastic-agent install \
–fleet-server-es=https://localhost:9200 \
–fleet-server-service-token=YOUR_SERVICE_TOKEN \
–fleet-server-policy=fleet-server-policy \
–fleet-server-es-ca-trusted-fingerprint=YOUR_FLEET_SERVER_CA_FINGERPRINT
Replace YOUR_SERVICE_TOKEN with the token generated in Kibana and YOUR_FLEET_SERVER_CA_FINGERPRINT with the CA fingerprint from your Elasticsearch instance.
After enrolling, the Fleet Server will be up and running.
This process sets up the complete Elastic Stack (Elasticsearch, Kibana, and Fleet Server) on a single Ubuntu machine, ready for local testing or small-scale deployments.
